


Supplies:
Eye Candy 5 Impact: Free Trial CLICK HERE
My zip: Paperclip preset shape for PSP and PS, SK Paperclip Bevel, Sample patterns DOWNLOAD HERE
* Place the SK Paperclip Bevel.f1s into the Bevel folder of Eye Candy 5 Impact.
*Copy and paste the psp paperclip shape into your Preset Shapes folder, wherever that may be on your computer.
* I've also included a paperclip PNG file in the zip as well for anyone who can't use the PSP or PS shape. Just turn it into a brush and follow the tut.
* This tut is done with coloured swatches to use for a pattern over your paperclip. You can download some coloured tiles from various sites on the net, or you can use my striped paper tut to make your own. You can also just use a plain colour or a gradient instead of a pattern, but I think using a pattern is more interesting. I've included a few sample swatches for you to use with this tut for now.
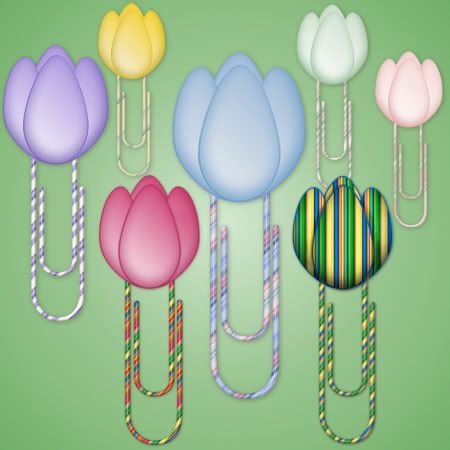
* First, we'll make the basic paperclip, then we'll move on to the tulip topper.
1. Open up a 400w x 550h transparent image.
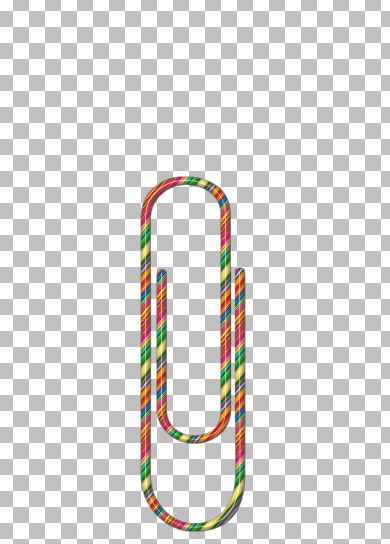
2. Choose a pattern from one of the sample images in the zip. I'm using my All Day Sucker pattern for this tutorial.
3. Set it as your foreground and background pattern in the materials palette. I've chosen to use a scale of 50% and an angle of 40 for this. You can decided for yourself what settings you think you'd like.
4. Click on your Preset Shapes tool on the left, and find SK Paper Clip from the dropdown box. Anti-alias is checked, Create as vector is checked, line style is Solid, and a Width of 1.
5. Hold down your Shift key and drag your cursor from the top left corner, and release the mouse when your paperclip reaches the size that you want it to be. Be sure to leave enough room at the top to fit in our tulip topper. Here's my example:

6. Now, we'll give our paperclip a shiny bevel. Go up to the Effects tab, down to Plugins, and find Eye Candy 5 Impact, and choose Bevel. Find in the list SK All Day Sucker Paperclip, click it once to select it, then hit OK. This is what I have so far:
That's it for that part, now on to the tulip topper. I used Whisper's EZ Tulip tutorial to do the flower topper. You can go to her site Whispers Corner, and do pages 1 & 2 to get the tulip made.
* The colour I used for my topper is #CA3166.

7. When you've completed the tulip tut, I tubed mine so that I could resize it to the proportions that fit the size of my paperclip. Next, just copy and paste it onto your paperclip layer, center it on the top of the paperclip, and merge visable your layers.
That's it, we're done :)
* Tip: You can also do patterns for your tulip topper.

TOU:
If you do this tutorial, your end result is yours to do whatever you wish; give it away as a freebie, use it as part of a kit, or sell it for profit. A mention or a link back here would be appreciated but is not mandatory. Please do not share the supplies or tut through email or any other means, send them here to my blog to get the supplies and tut for themselves.
The tulip image on the top of the paperclip is not my design. It belongs to Whisper's Corner and I can not find any terms of use on it, so to be on the safe side, do not use it for commercial purposes.


LOL......with all due respect to whispers tulip tutorial, I found doing the tulip top harder than doing your zipper tut. :) The fact that I'm not too up on my psp programme at the moment didn't help as I wasn't too sure of all her settings as she's using an older version I think.
Still, it all turned out brilliant again. Thanks for all your hard work. xx